NFC for iPhone - How to
2022-05-18 12:18
The iPhone has been equipped with a so-called NFC chip for quite some time. To be more precise, all newer iPhone models since the iPhone 6 are equipped with the near-field technology, which, for example, makes cashless and contactless payment via Apple Pay possible. Nevertheless, very few users know how the feature works and how to use it on the iPhone. In the following, I will show you how to use NFC on your iPhone.
NFC is one of those terms that Apple throws at its users with every new iPhone. However, many users are still in the dark when it comes to using the feature. The way it works is quickly explained: NFC ("Near Field Communication") is a radio technology that makes it possible to transmit small amounts of data over a short distance - a maximum of 5 cm. This means that the sender and receiver must be in close proximity to each other for the data to be exchanged. Information can then be read from an NFC tag, a type of sticker with an integrated NFC chip, by scanning it with the iPhone (more on this in a moment). This can be, for example, a link to a website or a digital business card in form of a vCard.
Although the first NFC-enabled smartphones were launched in 2008, Apple has only been equipping all new iPhone models with an NFC module since the iPhone 6. Accordingly, the following devices have an NFC chip:
NFC available only for Apple Pay:
- iPhone 6
- iPhone 6 Plus
- iPhone 6s
- iPhone 6s Plus
- iPhone SE (1st gen.)
NFC available for app developers:
- iPhone 7
- iPhone 7 Plus
- iPhone 8
- iPhone 8 Plus
- iPhone X
NFC available for app developers + NFC background mode capabilities:
- iPhone SE (2nd + 3rd gen.)
- iPhone XS
- iPhone XS Max
- iPhone XR
- iPhone 11
- iPhone 11 Pro (Max)
- iPhone 12
- iPhone 12 mini
- iPhone 12 Pro
- iPhone 12 Pro Max
- iPhone 13
- iPhone 13 mini
- iPhone 13 Pro
- iPhone 13 Pro Max
In the App Store you can download my free app NFC & RFID for iPhone. The app supports reading and writing of NFC tags on all iPhone models from iPhone 7 onwards as of iOS 13. Older models - such as the iPhone 6s - do not support reading and writing of NFC tags.
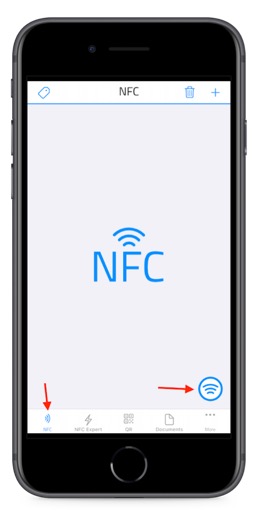
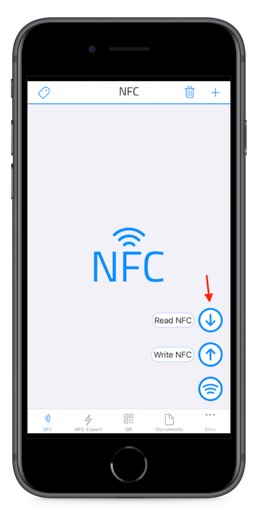
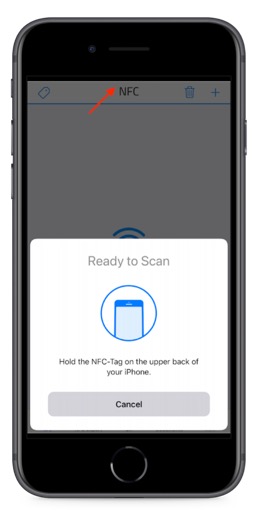
When you open the app go to the NFC tab and tap the scan button on bottom right. There you can choose between NFC reading and writing. Let's start with reading. Tap "Read NFC". Now the "Ready to scan" sheet appears and you can place your NFC tag on the top of your iPhone. It doesn't matter if you use the front or backside. The iPhone should detect it either way.
If you don't see the button, you may need to add the feature to the Control Center. To do this, follow these steps:
The iPhone 13, iPhone 13 mini, iPhone 13 Pro (Max), iPhone 12, iPhone 12 mini, iPhone 12 Pro (Max), iPhone XS (Max), iPhone XR, iPhone 11 as well as iPhone 11 Pro (Max) and iPhone SE (2nd + 3rd gen.) models, on the other hand, have the so-called "NFC Background Mode" feature. NFC tags can thus be read automatically as soon as the iPhone is unlocked and the screen is turned on without having to start the NFC tag reader first. The iPhone then keeps looking for data on NFC tags in the background (only URLs). When a tag has been detected, a notification appears on the display, prompting the user to open the item in the respective app.
Since iOS 13, you can create automations via the Shortcuts app on the iPhone and trigger them via NFC tag. So for the first time you have the possibility to use NFC tags to trigger your own actions - e.g. playing a song or starting HomeKit scenes - and to execute them as soon as you hold the iPhone to the tag.
The whole thing only works on iPhones with NFC background mode capabilities. Older iPhone models do not support NFC-based automations via Shortcuts directly but you can trigger automations via NFC with my app.
By the way, you can buy the necessary tags in the form of stickers with an integrated NFC chip for little money on Amazon through my affiliate links.
It sounds complicated at first, but in principle it is very easy. To do this, open the pre-installed Shortcuts app on your iPhone and go to the "Automation" tab at the bottom. Then tap the plus button at the top right and go to "Create Personal Automation".
Scroll down to the next level and select "NFC" as the trigger for your (not yet created) automation. Then press the "Scan" button and hold your iPhone up to the NFC sticker.
After you have given the NFC tag a name, click on "Done" or "Next" in the upper right corner. Now you can assign an action to the sticker by tapping on "Add action". Then select an action from the categories or suggestions that should be started when you hold the iPhone to the sticker. This could be starting a call, sending a message, or playing a song, for example.
Confirm your selection with a tap on "Next" or "Done" in the upper right corner and you have created your first NFC-supported automation. You can now place an NFC tag wherever you use your iPhone frequently - e.g. in the office, in the bedroom, in the car or at the house entrance - label it and perform actions by holding your iPhone near the sticker.
What is NFC?
NFC is one of those terms that Apple throws at its users with every new iPhone. However, many users are still in the dark when it comes to using the feature. The way it works is quickly explained: NFC ("Near Field Communication") is a radio technology that makes it possible to transmit small amounts of data over a short distance - a maximum of 5 cm. This means that the sender and receiver must be in close proximity to each other for the data to be exchanged. Information can then be read from an NFC tag, a type of sticker with an integrated NFC chip, by scanning it with the iPhone (more on this in a moment). This can be, for example, a link to a website or a digital business card in form of a vCard.
Which iPhones are NFC-enabled?
Although the first NFC-enabled smartphones were launched in 2008, Apple has only been equipping all new iPhone models with an NFC module since the iPhone 6. Accordingly, the following devices have an NFC chip:
NFC available only for Apple Pay:
- iPhone 6
- iPhone 6 Plus
- iPhone 6s
- iPhone 6s Plus
- iPhone SE (1st gen.)
NFC available for app developers:
- iPhone 7
- iPhone 7 Plus
- iPhone 8
- iPhone 8 Plus
- iPhone X
NFC available for app developers + NFC background mode capabilities:
- iPhone SE (2nd + 3rd gen.)
- iPhone XS
- iPhone XS Max
- iPhone XR
- iPhone 11
- iPhone 11 Pro (Max)
- iPhone 12
- iPhone 12 mini
- iPhone 12 Pro
- iPhone 12 Pro Max
- iPhone 13
- iPhone 13 mini
- iPhone 13 Pro
- iPhone 13 Pro Max
Read NFC tags with NFC & RFID for iPhone
In the App Store you can download my free app NFC & RFID for iPhone. The app supports reading and writing of NFC tags on all iPhone models from iPhone 7 onwards as of iOS 13. Older models - such as the iPhone 6s - do not support reading and writing of NFC tags.
When you open the app go to the NFC tab and tap the scan button on bottom right. There you can choose between NFC reading and writing. Let's start with reading. Tap "Read NFC". Now the "Ready to scan" sheet appears and you can place your NFC tag on the top of your iPhone. It doesn't matter if you use the front or backside. The iPhone should detect it either way.
If there is data in the NFC Data Exchange Format (NDEF) on your NFC tag then the data will be read and displayed. Please note: Not every card you find out there is a NFC tag. NFC is a subset of RFID and many of the cards out there have a built in RFID tag which won't be recognized by your iPhone. Also there is no way for developers like me to read credit cards. If you try to scan them with my app nothing will happen.
Write NFC tags with NFC & RFID for iPhone
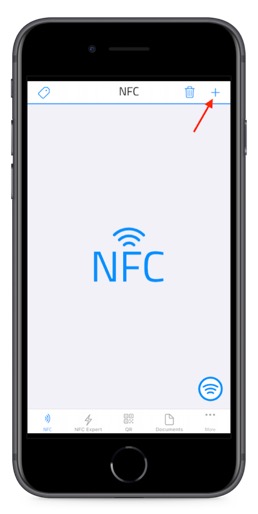
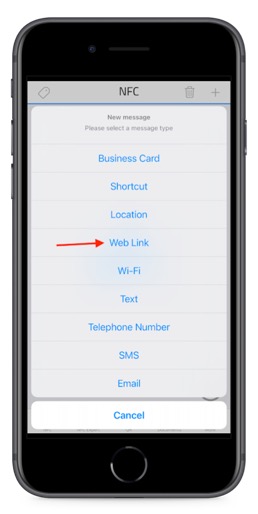
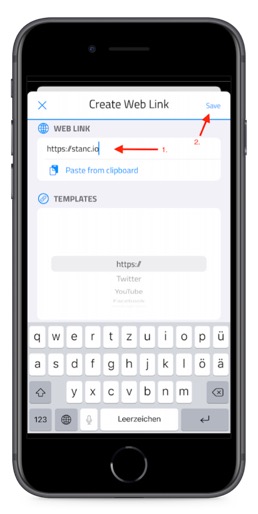
- Tap the plus button on the top right and select "Web Link" for the purpose of this tutorial. On the "Create Web Link" screen enter a URL and hit the save button on the top right.
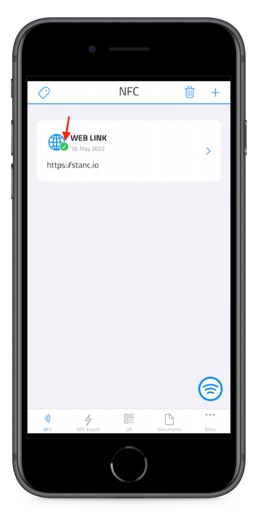
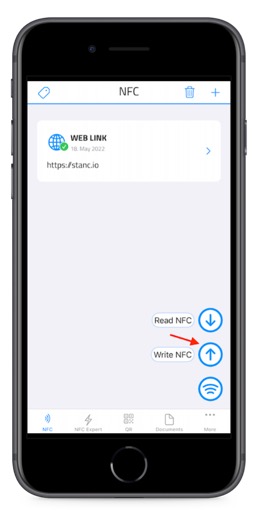
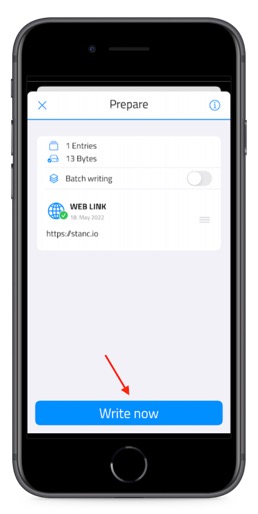
- Now you should see a list with one entry that has the URL that you typed in. The checkmark on the entry tells you that it is selected for writing (you can select or deselect for writing by swiping the the entry from right to left or by going to the detail screen and select "Add to write" or "Remove from write"). Now tap the NFC button in the bottom right and select "Write NFC". The "Prepare" screen appears and there you can tap "Write now".
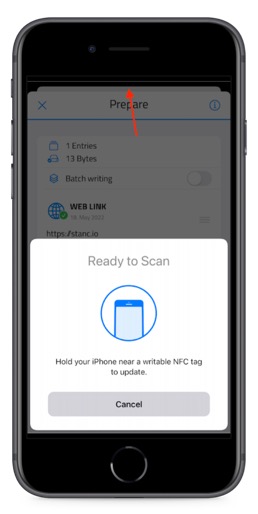
- The "Ready to scan" sheet pops up and you can place your NFC tag on the top of your iPhone and voilà your NFC tag is now written.
Read NFC tags via the systems NFC tag reader
Depending on the iPhone model, there are different ways to use the NFC function. Since iOS 14, the "NFC tag reader" function is available by default to all users who have at least an iPhone 7. So, if you own an iPhone 7 or newer, you can use the tag reader provided by the system to read NFC tags. But be aware the system tag reader is very limited and can only read urls (https:// for example). So if there is a vCard (digital business card) on your tag then iOS wont recognize the data. Nevertheless you can turn on the feature in the Control Center by tapping the NFC button and holding your iPhone near an NFC tag to trigger an action.If you don't see the button, you may need to add the feature to the Control Center. To do this, follow these steps:
- Open the Settings app on your iPhone.
- Then select the "Control Center" option.
- Scroll down and tap on the green plus button to the left of "NFC Tag Reader".
The iPhone 13, iPhone 13 mini, iPhone 13 Pro (Max), iPhone 12, iPhone 12 mini, iPhone 12 Pro (Max), iPhone XS (Max), iPhone XR, iPhone 11 as well as iPhone 11 Pro (Max) and iPhone SE (2nd + 3rd gen.) models, on the other hand, have the so-called "NFC Background Mode" feature. NFC tags can thus be read automatically as soon as the iPhone is unlocked and the screen is turned on without having to start the NFC tag reader first. The iPhone then keeps looking for data on NFC tags in the background (only URLs). When a tag has been detected, a notification appears on the display, prompting the user to open the item in the respective app.
Start Shortcuts automation via NFC
Since iOS 13, you can create automations via the Shortcuts app on the iPhone and trigger them via NFC tag. So for the first time you have the possibility to use NFC tags to trigger your own actions - e.g. playing a song or starting HomeKit scenes - and to execute them as soon as you hold the iPhone to the tag.
The whole thing only works on iPhones with NFC background mode capabilities. Older iPhone models do not support NFC-based automations via Shortcuts directly but you can trigger automations via NFC with my app.
By the way, you can buy the necessary tags in the form of stickers with an integrated NFC chip for little money on Amazon through my affiliate links.
It sounds complicated at first, but in principle it is very easy. To do this, open the pre-installed Shortcuts app on your iPhone and go to the "Automation" tab at the bottom. Then tap the plus button at the top right and go to "Create Personal Automation".
Scroll down to the next level and select "NFC" as the trigger for your (not yet created) automation. Then press the "Scan" button and hold your iPhone up to the NFC sticker.
After you have given the NFC tag a name, click on "Done" or "Next" in the upper right corner. Now you can assign an action to the sticker by tapping on "Add action". Then select an action from the categories or suggestions that should be started when you hold the iPhone to the sticker. This could be starting a call, sending a message, or playing a song, for example.
Confirm your selection with a tap on "Next" or "Done" in the upper right corner and you have created your first NFC-supported automation. You can now place an NFC tag wherever you use your iPhone frequently - e.g. in the office, in the bedroom, in the car or at the house entrance - label it and perform actions by holding your iPhone near the sticker.